Functional Preprocessing#
Initial Preprocessing#
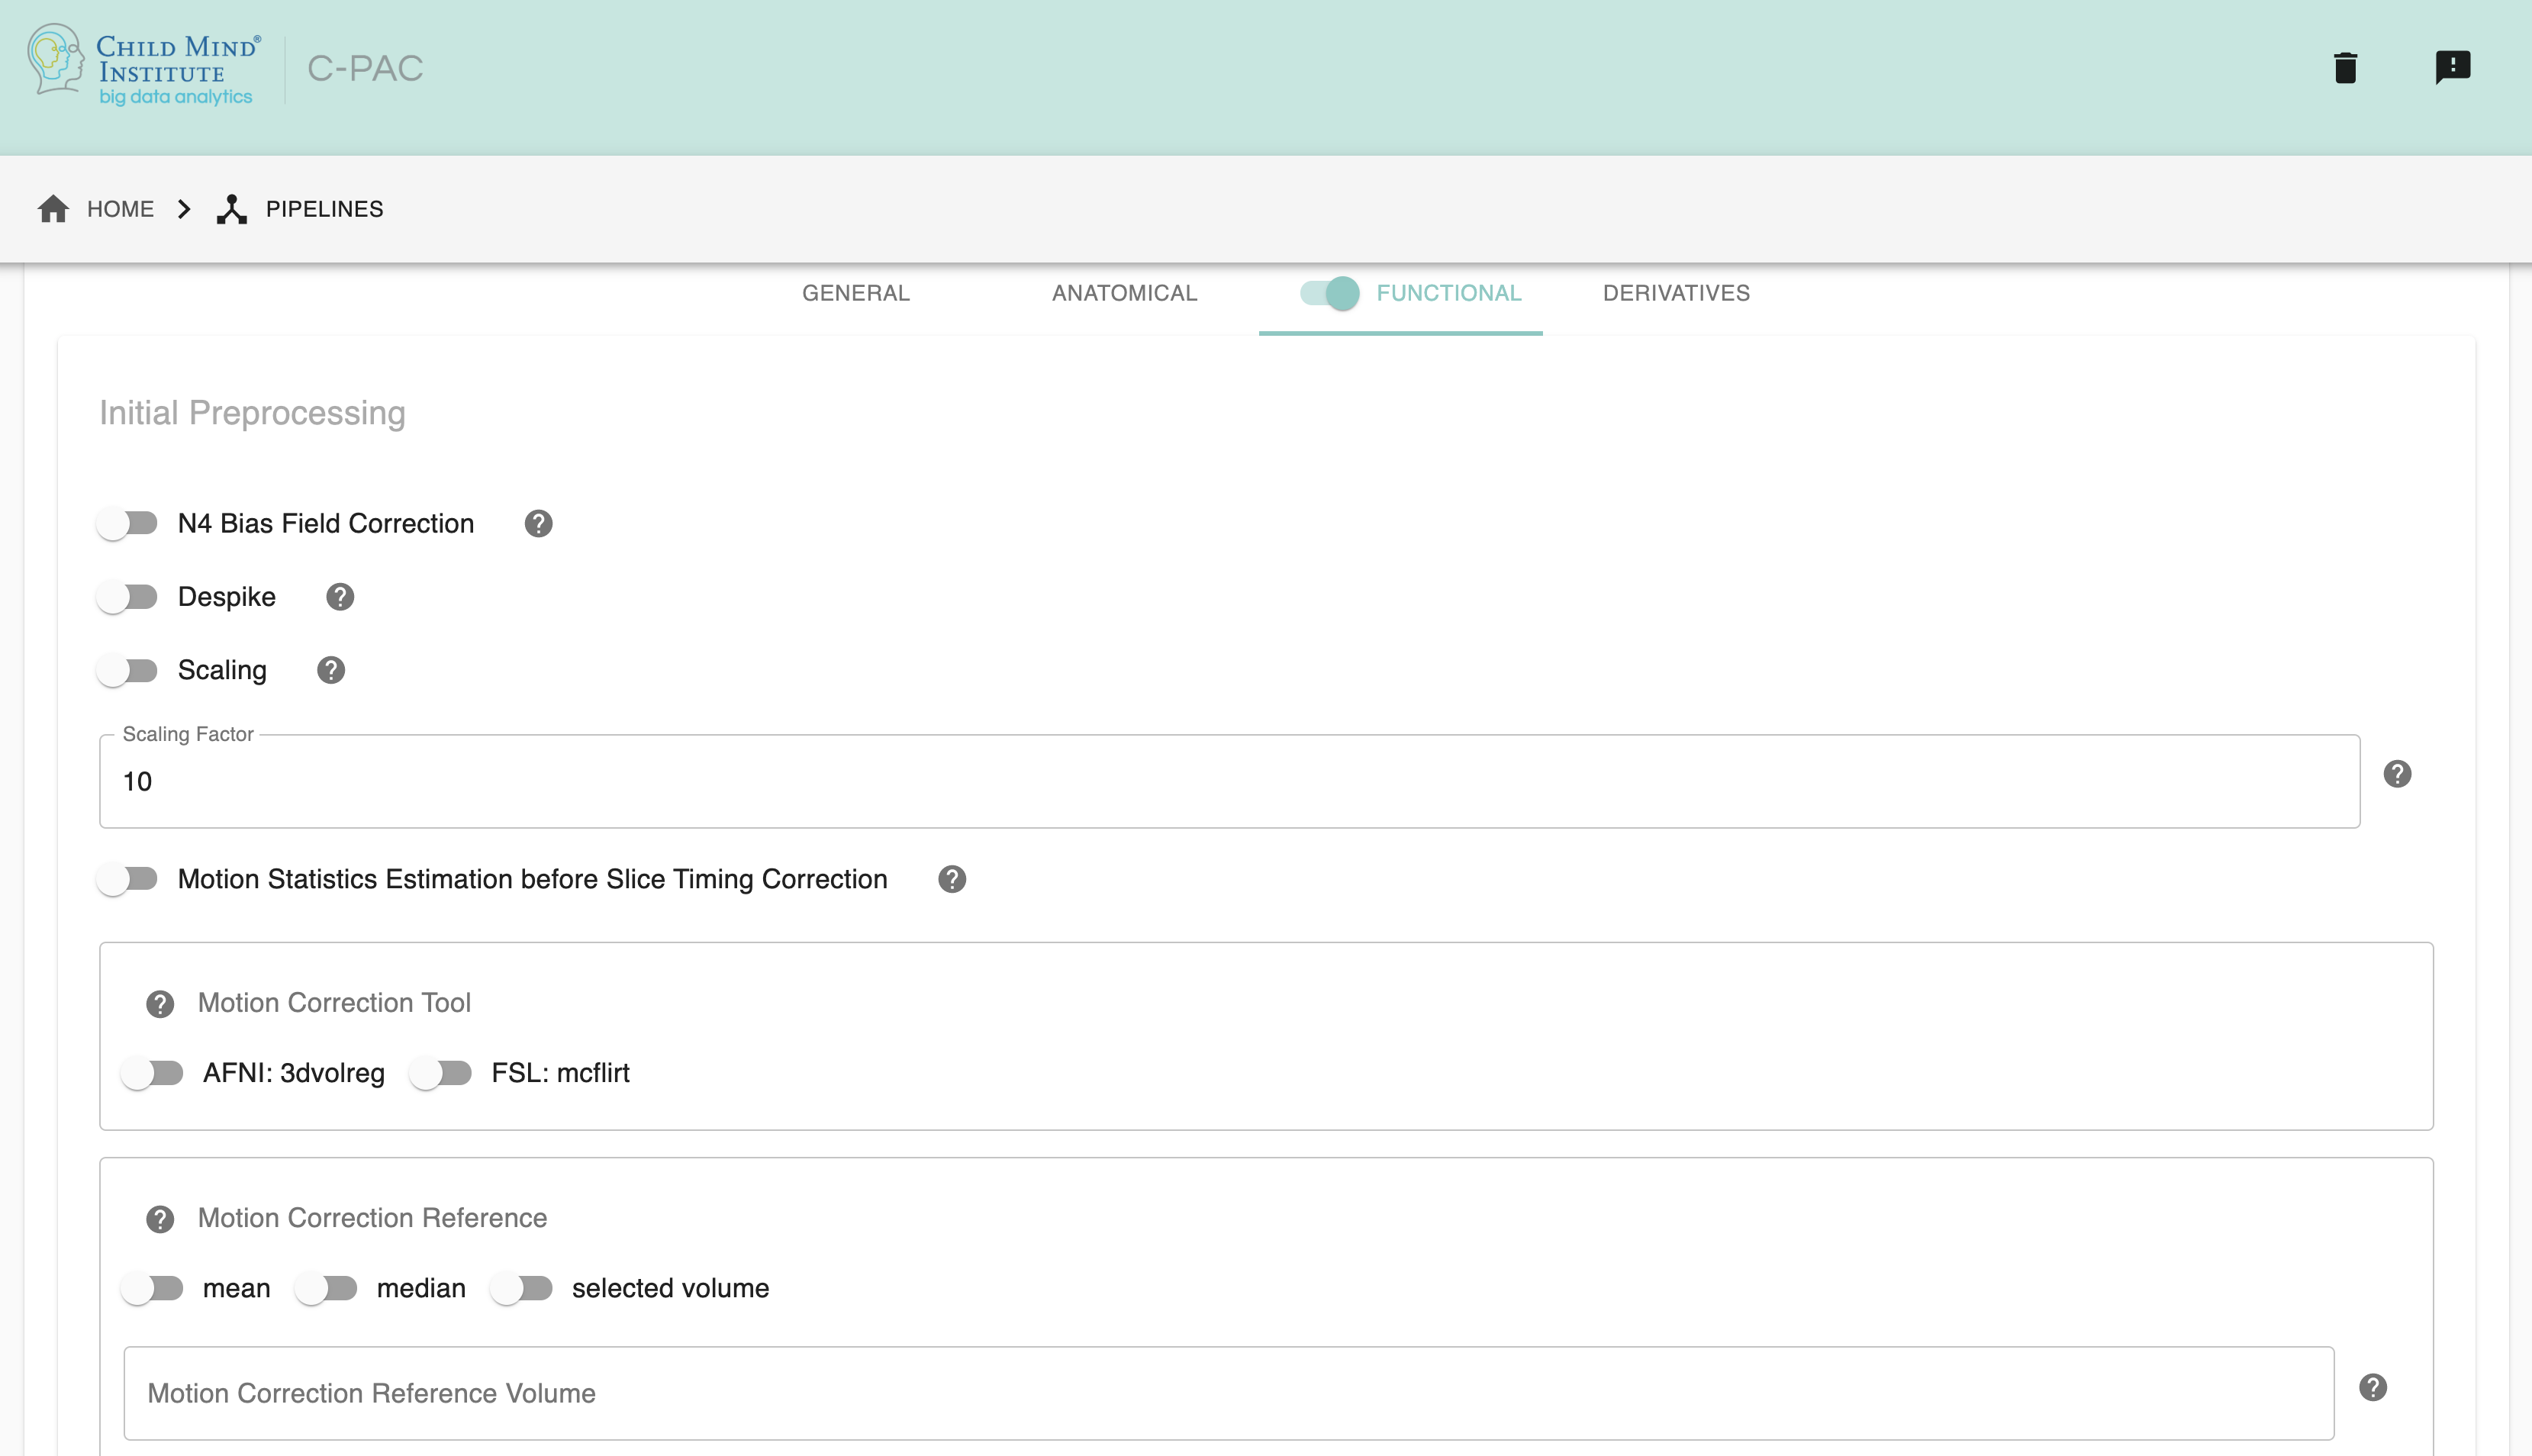
ANT’s N4BiasFieldCorrection - [On, Off]: Choose On to perform N4 Bias Field Correction on mean EPI image, may help enhance coregistration quality. Default is Off.
Despike - [On, Off, On/Off]: Choose On to perform AFNI 3dDespike. Default is Off.
Scaling - [On, Off]: Choose On to scale the brain to a different size, especially optimal for rodent data.
Scaling Factor - [integer]: The scaling factor of the brain. Default is 10.
Motion Statistics before Slice Timing Correction - [On, Off, On/Off]: Choose On to calculate motion parameter estimation before slice timing correction, with actual motion correction still occurring after slice timing correction. The motion parameters go on to be used in nuisance regression and statistics reporting. Default is Off.
Motion Correction Tool - [3dvolreg, mcflirt]: Choose motion correction method. Options: AFNI volreg, FSL mcflirt. Default is AFNI volreg.
Motion Correction Reference - [mean, median, selected volume]: Choose motion correction reference. Options: mean, median, selected volume. Default is mean.
Motion Correction Reference Volume - [integer]: Choose an integer as the motion correction reference volume if choosing “selected volume” as motion correction reference.
Motion Estimate Filter: Adapted from the motion estimate filter by DCAN Labs. Based on the filter described in this publication.
run - [False, True]: Toggle the filter.
filter_type - [‘notch’, ‘lowpass’]: Use either a notch/bandstop or low-pass filter.
filter_order - [integer]: Specify the filter order. Default is 4.
breathing_rate_min - [integer]: Lowest breaths-per-minute value in the entire dataset (across all participants). Required for both notch and lowpass filters. Mutually exclusive with center_frequency, filter_bandwidth, and lowpass_cutoff. Using this parameter will guide the automatic design of the filter.
breathing_rate_max - [integer]: Highest breaths-per-minute value in the entire dataset (across all participants). Required for the notch filter. Mutually exclusive with center_frequency, filter_bandwidth, and lowpass_cutoff. Using this parameter will guide the automatic design of the filter.
center_frequency - [float]: Notch filter only. Manually select the center frequency for the notch filter. Mutually exclusive with breathing_rate_min and breathing_rate_max. Use this to manually design the filter.
filter_bandwidth - [float]: Notch filter only. Manually select the bandwidth for the notch filter. Mutually exclusive with breathing_rate_min and breathing_rate_max. Use this to manually design the filter.
lowpass_cutoff - [float]: Lowpass filter only. Manually select the cutoff frequency for the lowpass filter. Mutually exclusive with breathing_rate_min and breathing_rate_max. Use this to manually design the filter.
Configuration Without the GUI#
The following nested key/value pairs will be set to these defaults if not defined in your pipeline configuration YAML.
For motion_estimate_filter, if breathing_rate_min and breathing_rate_max are provided, the filter design attributes (center_frequency, filter_bandwidth, lowpass_cutoff) are automatically configured. But if you provide these directly, you don’t need the breathing rates. If all all parameters are provided, the filter design attributes will be ignored in favor of the breathing_rate_* attributes. A configuration must match at least one row in the following table:
|
|
|
|
|
|
|
|---|---|---|---|---|---|---|
Off |
||||||
On |
notch |
required |
required |
|||
On |
notch |
None |
None |
required |
required |
|
On |
lowpass |
required |
||||
On |
lowpass |
None |
required |
Slice Timing Correction#
Most fMRI images are created by combining multiple 2D slices into a single 3D volume. Slices are acquired one after another, either sequentially in ascending or descending order, or in an interleaved manner, such that every other slice is acquired in a first pass, and the remaining slices are acquired in a second pass. The time elapsed between the acquisition of the first and last slice is equivalent to the repetition time (TR) used. Slice timing correction acts to adjust the timecourse of voxels in each slice to account for these differences. This is done by interpolating the data in each slice to match the timing of a reference slice. Slice timing correction is necessary because many statistical models used for fMRI analysis assume that all voxels are measured simultaneously. As such, differences in acquisition time between slices can cause confounds.
You can configure your slice time correction settings through the C-PAC pipeline configuration editor, under the Time Series Options tab in the Functional Preprocessing section. Here you can select whether or not to run Slice Time Correction, as well as which slice acquisition pattern to enter.
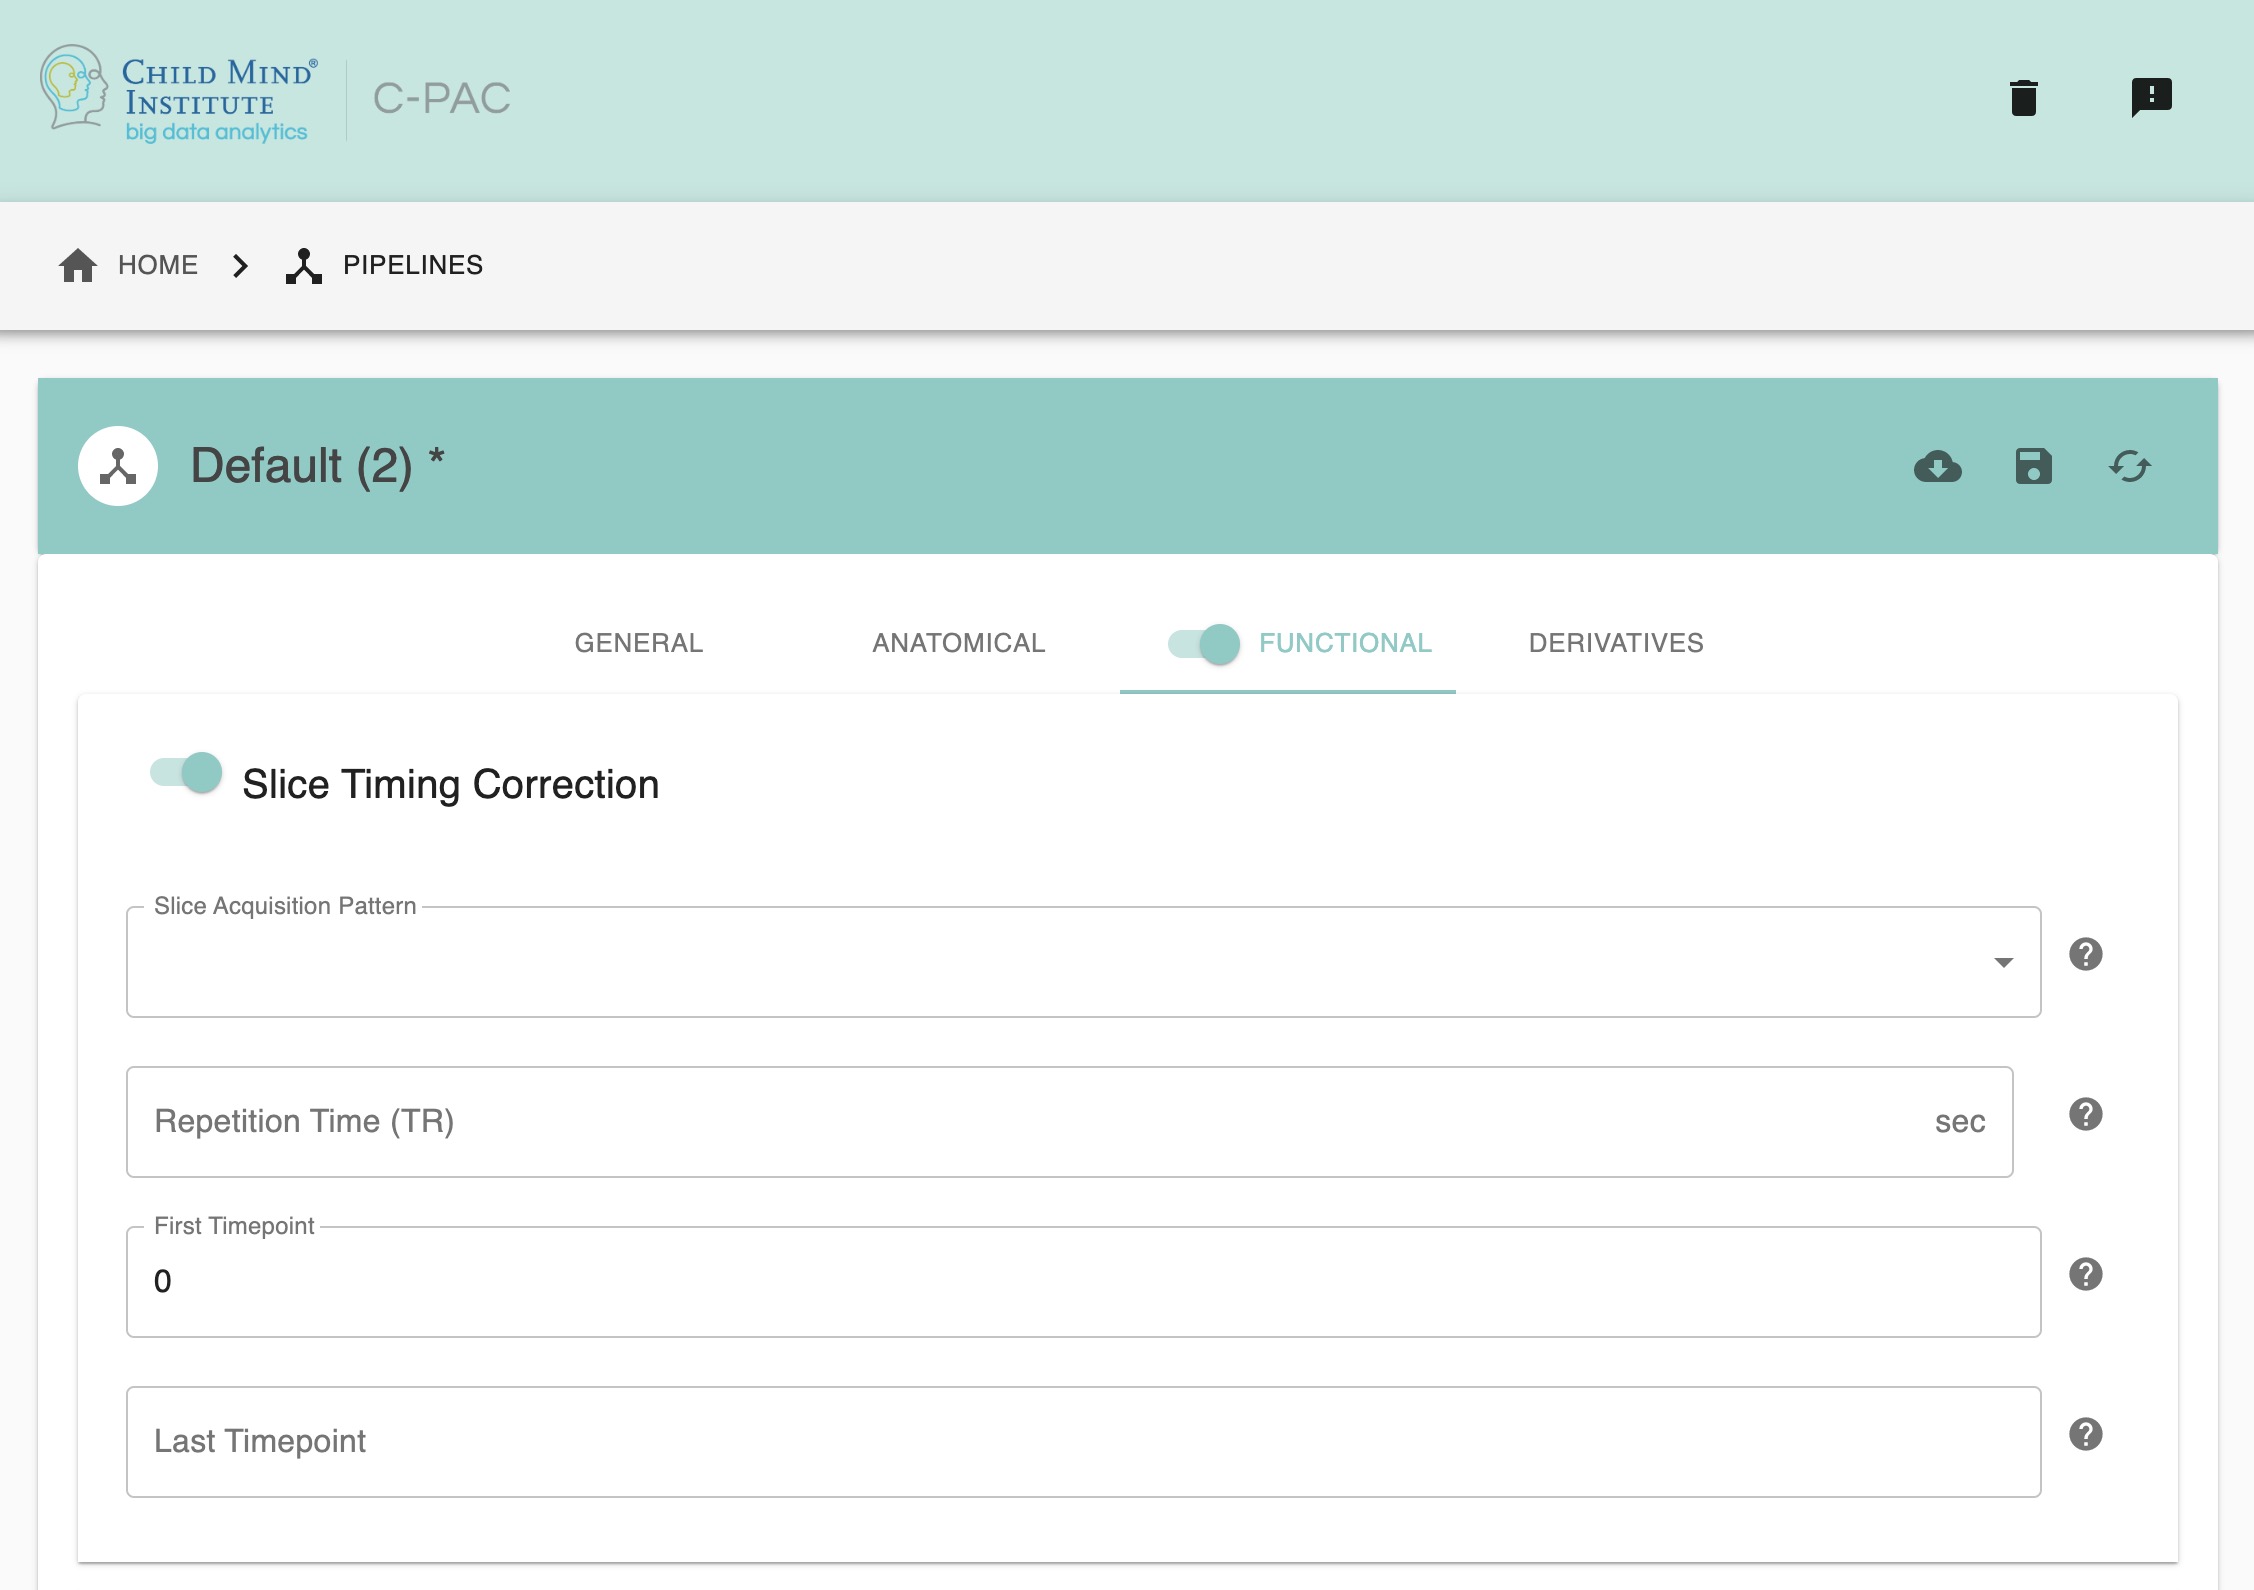
First Timepoint - [integer]: The starting volume of the scan. If you need to censor the first volumes of a scan to facilitate stable magnetization, you can do so here.
Last Timepoint - [integer/text]: The last volume of the timeseries. If you wish to cut off the timeseries before a specific point, you can do so here. Otherwise, set this to ‘End’.
TR - [numerical value]: The TR for volume acquisitions. If you wish to have this information read from the NifTI header set this to ‘None’.
Perform Slice Time Correction - [On, Off, On/Off]: Interpolate voxel timeseries so that sampling occurs at the same time.
Slice Acquisition Pattern - [Use NifTI Header, alt+z, alt+z2, alt-z, alt-z2, seq+z, seq-z]: The order of slice acquisition for the scans.
Note that if a scan parameters file was used to construct the participant list, the parameters defined in this file will override the settings used here.
Configuration Without the GUI#
The following nested key/value pairs will be set to these defaults if not defined in your pipeline configuration YAML.
Through the Data Configuration#
You can also specify slice timing parameters within the subject list. If you wish to specify slice timing correction parameters in this way, scan parameters must be supplied to C-PAC in a .csv file, and the path to this file provided when setting up a new subject list.
scan_parameters.csv file available for download here.scan_parameters_multiscan.csv file available for download here.Slice Timing information should be entered into these files as follows:
Site - Site name corresponding to a site-level folder in your directory structure (e.g.
site_1).Scan - Only for
scan_parameters_multiscan.csv. Scan name corresponding to a scan-level folder in your directory structure (e.g.anat,rest)TR - TR in seconds.
Reference - Desired reference slice (usually the middle slice).
Acquisition - Acquisition order.
altplus - Alternating in the +z direction
alt+z - Alternating in the +z direction
alt+z2 - Alternating, but beginning at slice #1
altminus - Alternating in the -z direction
alt-z - Alternating in the -z direction
alt-z2 - Alternating, starting at slice #nz-2 instead of #nz-1
seqplus - Sequential in the plus direction
seqminus - Sequential in the minus direction
FirstTR - First volume to include in analysis. (Reminder, volumes start at 0)
LastTR - Last volume to include in analysis.
If your data does not conform to one of the 6 acquisition orders in the list above (as would be the case for multiband and multi-echo sequences), you must generate acquisition order files before running slice timing correction. This is done using the AFNI command dicom_hdr and specifying the first DICOM file in an image sequence, as well as the name of an output .txt file.:
dicom_hdr -slice_times /path/to/file.dcm > output_name.txt
This will output a text file with the name you specified. Each number in this file corresponds to a slice and the time when it was acquired (relative to the beginning of the TR). The following is an example of an acquisition order file for a a multiband fMRI scan with 40 slices and TR=645ms:
0.0 452.5 257.5 65.0 517.5 322.5 130.0 582.5 387.5 195.0 0.0 452.5 257.5 65.0 517.5 322.5 130.0 582.5 387.5 195.0 0.0 452.5 257.5 65.0 517.5 322.5 130.0 582.5 387.5 195.0 0.0 452.5 257.5 65.0 517.5 322.5 130.0 582.5 387.5 195.0
The path to the acquisition order file for each scan should be specified in the “Acquisition” column of your scan_parameters.csv or scan_parameters_multiscan.csv file.
Note: alt+z2 is the order most commonly used on Siemens scanners for interleaved scans with an even number of slices.
Note: Scan parameter information specified for slice timing correction will override the settings specified in the pipeline configuration YAML.
Field Map-Based Distortion Correction#
Distortion correction is a method that aims to reduce distortion in EPI (fMRI) images caused by inhomogeneities in the magnetic field (which often stem from differences in tissue across tissue boundaries in the head). C-PAC has the option of including field map-based distortion correction into your pre-processing pipeline, and two methods, Phase Difference (PhaseDiff) or Phase-Encoding Polarity (Blip-up/Blip-down) to perform distortion correction.
Performing PhaseDiff distortion correction requires the acquisition of a phase difference image and two magnitude images. The “best of the two” magnitude images is chosen, and a final input of one phase difference file and one magnitude file are then used by the pre-processing pipeline. Phase-Encoding Polarity (commonly known as blip-up/blip-down) employs phase-encoding direction-specific EPI field maps to correct for distortion in the direction of the phase-encoding. It uses AFNI 3dQWarp to calculate the distortion unwarp for EPI field maps of opposite/same phase encoding direction.
These files are used to generate the field map during pre-processing, and they can be provided to the C-PAC pipeline through the data configuration (participant list) file. More information on how to set this data configuration file is available here.
The C-PAC pipeline configuration builder provides options for configuring the Distortion Correction workflow. The field maps are generated within the distortion correction workflow, and the result is subsequently sent to the functional-to-anatomical registration step (FSL FLIRT, and with Boundary-Based Registration if selected and if tissue segmentation is run), where the distortion is “un-warped” during the transform.
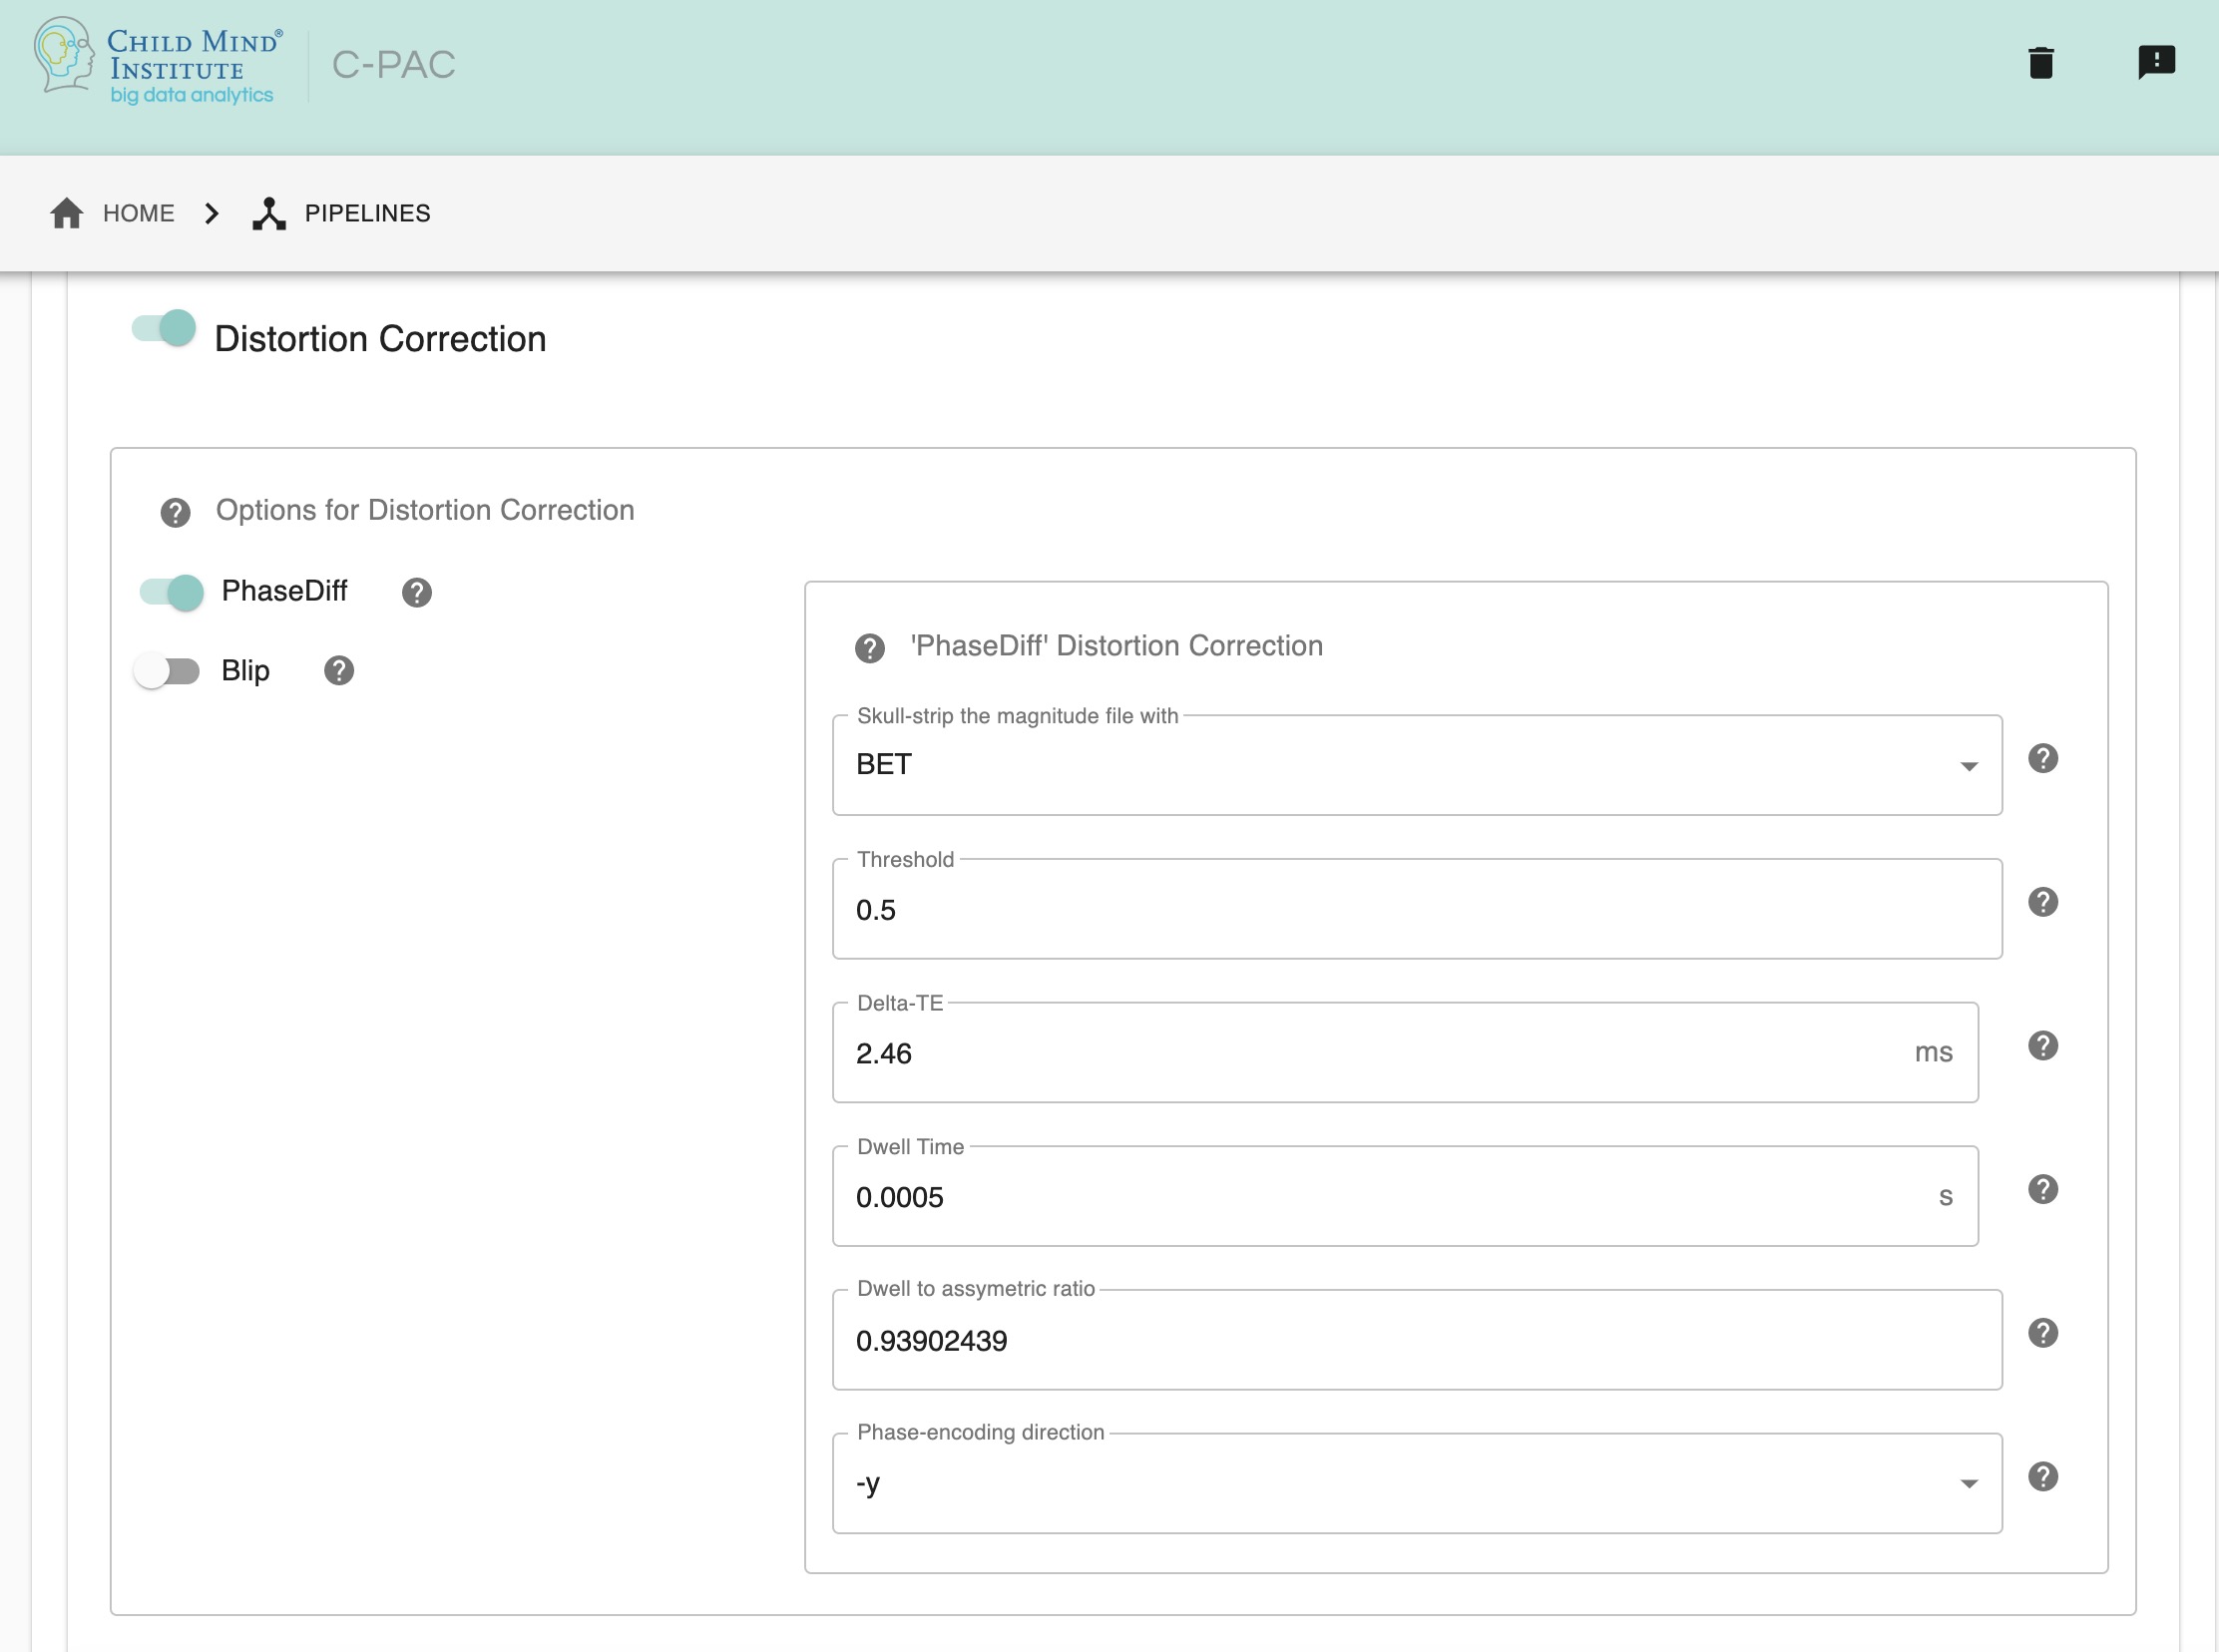
Distortion correction - [On, Off]: Perform field map-based distortion correction.
PhaseDiff - [On, Off]: Perform field map correction using a single phase difference image, a subtraction of the two phase images from each echo. Default scanner for this method is SIEMENS.
Blip - [On, Off]: Uses AFNI 3dQWarp to calculate the distortion unwarp for EPI field maps of opposite/same phase encoding direction.
Skull-strip the magnitude file with - [BET, 3dSkullStrip]: Since the results of the distortion correction can be strongly affected by the strength of the skull-stripping of the magnitude file, the choice between using FSL’s BET or AFNI’s 3dSkullStrip is left open, as these tools can have varying results depending on the data itself. The choice of tool is only for skull-stripping the magnitude file, and not for the skull-stripping step of the main anatomical pre-processing part of the pipeline.
BET threshold/AFNI shrink factor - [float]: The threshold for brain extraction. FSL requires tight skull-stripping, erring on the side of ignoring brain voxels rather than adding noise. However, it might not be required to increase the threshold in all datasets, so it is important to check your dataset before changing the threshold.In FSL-BET, this is referred to as “threshold intensity” and in AFNI’S 3dSkull Strip, it is the -shrink_factor. The default value is 0.5.
DeltaTE, in ms - [float]: The time difference between the first magnitude image and the second magnitude image. The default value is 2.46 ms, which is widely used for SIEMENS, but it may differ with different datasets acquired by other MRI scanner brands, so it is important to ascertain this value specific to your data.
Dwell Time, in s - [float]: The dwell time is also known as echo spacing, and it is the time between the start of the readout of two successive lines in k-space during the EPI acquisition. This is a value obtained from the functional EPI (NOT the fieldmap). Here, the default value is 0.0005s.
Dwell to asymmetric ratio - [float]: This is the ratio between the Dwell time, as referenced above, and the asymmetric time. Here, the default value is 0.93902439.
Phase encoding direction - [string]: This is the position of the voxels in the input image, and can have values of x/y/z or -x/-y/-z.
Configuration Without the GUI#
The following nested key/value pairs will be set to these defaults if not defined in your pipeline configuration YAML.
Functional to Anatomical Registration#
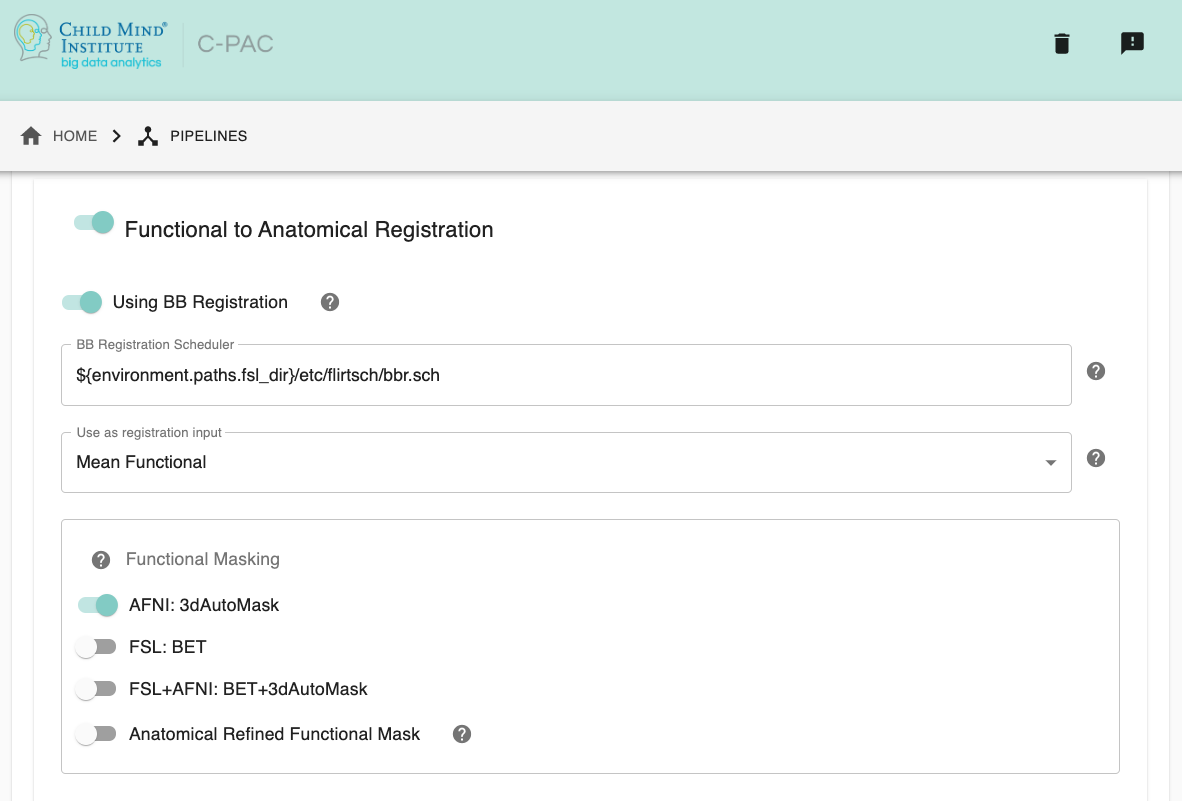
Run Functional-to-Anatomical Registration - [On, Off]: Register the functional timeseries and functional mean images to the T1 anatomical images.
Using BB Register - [On, Off, On/Off]: Use Boundary-Based Registration in the functional-to-anatomical registration process. This uses the anatomical segmentation outputs to improve the co-registration of functional images to the anatomical. However, this may not be the best option if your anatomical images feature low contrast, resulting in segmentation which may not be of high quality.
Boundary Based Registration Scheduler - [path]: Standard FSL 5.0 Scheduler used for Boundary Based Registration. It is not necessary to change this path unless you intend to use non-standard MNI registration.
Use as Functional-to-Anatomical Registration Input - [Mean Functional, Selected Functional Volume]: Choose whether to use the mean of the functional/EPI as the input to functional-to-anatomical registration or one of the volumes from the functional 4D timeseries that you choose.
Functional Volume to Use as Input (Selected Functional Volume only) - [integer]: Only for when ‘Use as Functional-to-Anatomical Registration Input’ is set to ‘Selected Functional Volume’. Input the index of which volume from the functional 4D timeseries input file you wish to use as the input for functional-to-anatomical registration.
Functional Masking - [AFNI, FSL, FSL_AFNI, Anatomical_Refined]: Choose which tool to be used in functional masking - AFNI (3dAutoMask), FSL (BET), FSL_AFNI (BET+3dAutoMask) or Anatomical_Refined (generate functional mask by registering anatomical mask to functional space). Default is AFNI.
Configuration Without the GUI#
The following nested key/value pairs will be set to these defaults if not defined in your pipeline configuration YAML.
Configuring FSL BET options:#
Note: These options are pre-set for FSL BET’s default values. These do not need to be modified unless you are looking to optimize the results of skull-stripping for your particular dataset.
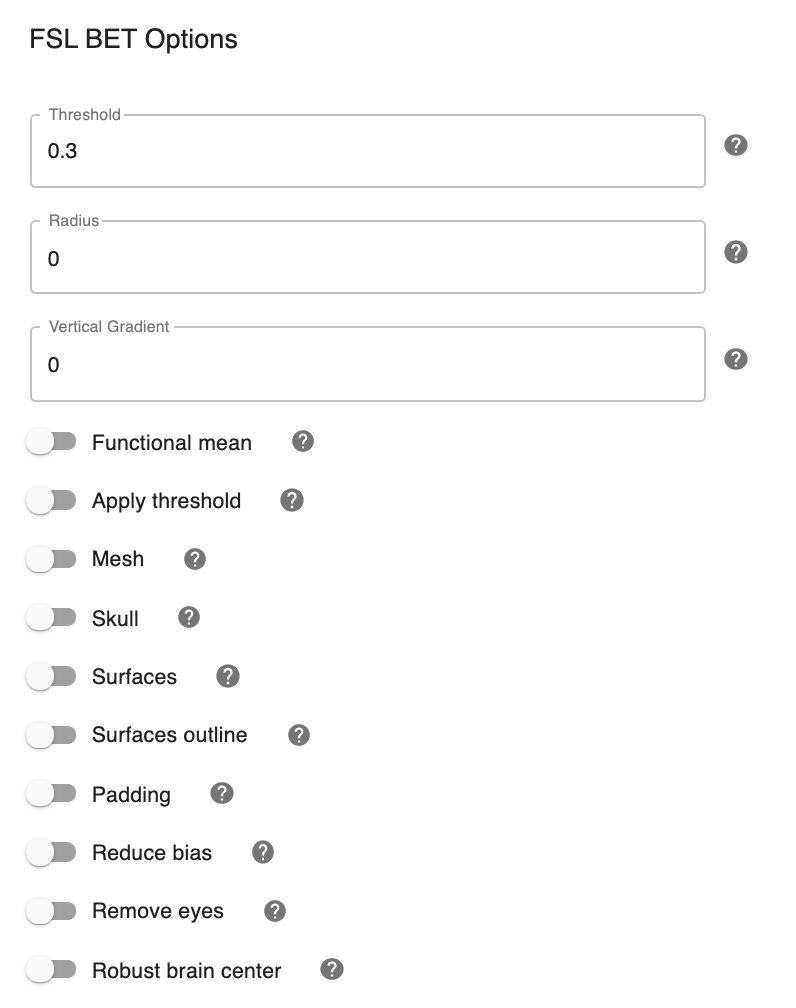
Threshold - [0.3]: Set the threshold value controlling the brain vs non-brain voxels. Default is 0.3
Radius - [0]: Integer value of head radius. Default is 0.
Vertical gradient - [0]: Vertical gradient un fractional intensity threshold. Within the range of (-1,1).
Func_mean - [Off,On]: Apply to 4D FMRI data, if bold_bet_functional_mean_boolean : Off. Mutually exclusive with functional,reduce_bias,robust,padding,remove_eyes,surfaces. Default is Off.
Apply Threshold - [Off,On]: Apply thresholding to segmented brain image and mask. Default is Off.
Mask - [Off, On]: Mask created along with skull stripping. Default option is Off.
Mesh - [Off, On]: Mesh created along with skull stripping. Default is Off.
Skull - [Off,On]: Create a Skull Image. Default is Off.
Surfaces - [Off, On]: Get additional skull and scalp surfaces by running bet2 and betsurf. This is mutually exclusive with reduce bias, robust, padding, remove_eyes.
Surfaces Outline - [Off, On]: Create a surface outline image, Default is Off.
Padding - [Off, On]: Add padding to the end of the image, improving BET. Mutually exclusive functional, reduce_bias, robust, padding, remove_eyes, surfaces.
Reduce bias - [Off, On]: Reduce bias and cleanup neck. Mutually exclusive with functional, reduce_bias, robust, padding, remove_eyes, surfaces.
Remove eyes - [Off,On]: Eyes and optic nerve cleanup. Mutually exclusive with functional, reduce_bias, robust, padding, remove_eyes, surfaces.
Robust brain center - [Off, On]: Robust brain center estimation. Mutually exclusive with functional, reduce_bias, robust, padding, remove_eyes, surfaces.
Configuration Without the GUI#
The following nested key/value pairs will be set to these defaults if not defined in your pipeline configuration YAML.
Functional to Template Registration#
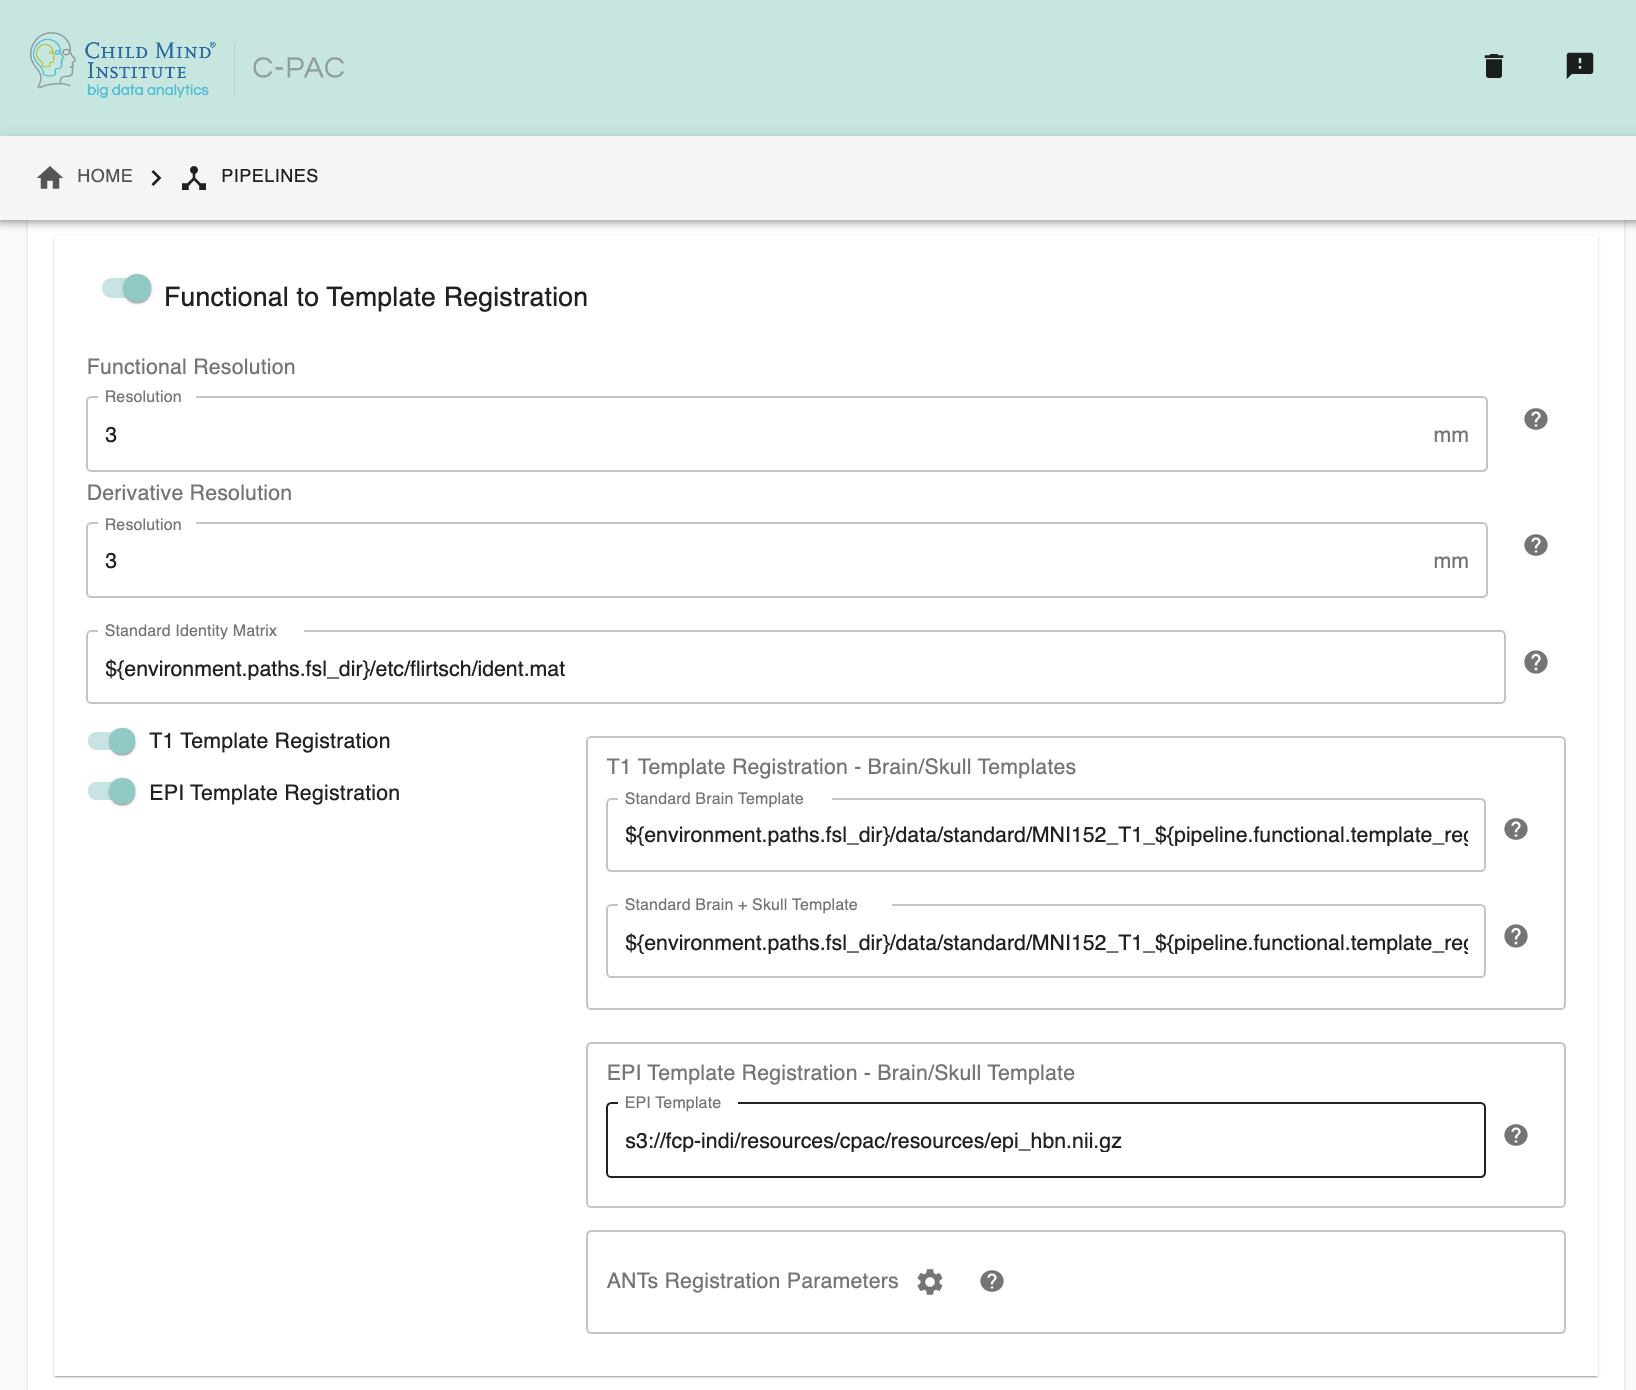
Run Functional to Template Registration - [On, Off]: Register functional images to a standard MNI152 template or EPI template. This option must be enabled if you wish to calculate any derivatives.
Functional Resolution - [1 An integer indicating three same dimensions (e.g., 1mm, 2mm, 3mm, 4mm); 2 A float number indicating three same dimensions (e.g., 3.5mm etc.); 3 Three numbers connected by ‘x’ indicating three different dimensions (e.g., 2.67mmx2.67mmx3mm etc.)]: The resolution (in mm) to which the preprocessed, registered functional timeseries outputs are written into. Note that selecting a 1 mm or 2 mm resolution might substantially increase your RAM needs- these resolutions should be selected with caution. For most cases, 3 mm or 4 mm resolutions are suggested. Float numbers and three different dimensions are supported.
Derivative Resolution - [1 An integer indicating three same dimensions (e.g., 1mm, 2mm, 3mm, 4mm); 2 A float number indicating three same dimensions (e.g., 3.5mm etc.); 3 Three numbers connected by ‘x’ indicating three different dimensions (e.g., 2.67mmx2.67mmx3mm etc.)]: The resolution (in mm) to which functional images are transformed during registration. Note that selecting a 1 mm or 2 mm resolution will substantially increase your RAM needs. For most cases, 3 mm or 4 mm resolutions are suggested.
Standard Identity Matrix - [path]: Matrix containing all 1’s. Used as an identity matrix during registration. It is not necessary to change this path unless you intend to use non-standard MNI registration.
T1 Template Registration - [On, Off]: Register functional images to a standard MNI152 template.
Standard Brain only Template (functional resolution) - [path]: Standard FSL Skull Stripped Template. Used as a reference image for functional registration.
Standard Template with Skull (functional resolution) - [path]: Standard FSL Anatomical Brain Image with skull.
EPI Template Registration - [On, Off]: Register functional images to a standard EPI template.
Standard Brain Template - [path]: Used as a reference image for functional EPI registration.
ANTs Registration Parameters : Clicking on the setting icon will bring up a dialog where you can set ‘antsRegistration’ parameters.
Configuration Without the GUI#
The following nested key/value pairs will be set to these defaults if not defined in your pipeline configuration YAML.